This is the continuation of last week's blog. The focus was on the ISTE Student Standard focusing on the first part of Empowered Learning 1c. Students use technology to seek feedback that informs and improves their practice and to demonstrate their learning in a variety of ways. This week the focus will be on the second part "demonstrating their learning in a variety of ways." The standard listed a few examples of how students can meaningfully demonstrate their learning in a more engaging form rather than completing worksheets or book work that does not require students to use their higher order thinking skills. For each example I have found digital tools that will provide students the opportunity to create and demonstrate their learning.
- Digital Posters, the possibilities are endless. Students could create digital anchor charts, step by step tutorials, graphic organizers, advertisement, etc.
- Adobe Spark
- Ditch That Textbook created a blog solely on how Adobe Spark can be used if you'd like some inspiration
- Autodraw
- Piktochart
- Google Drawings
- Blogs, one of the best ways to have students reflect whether it be about their learning through an entire unit or journaling.
- Digital Stories, take that writing prompt an extra mile by having students narrate or create a visual representation. Have students explain what they've learned about those powerful people in history, mathematical thinking, or hypothesis and conclusion!
- Assessments, at the moment I feel this is the most common way of using technology so if you want a safe and simple step into integrating technology into your classroom this is what I recommend starting with. However, I challenge you to keep moving past the typical assessment.
- Kahoot
- Google Forms
- ItsLearning Tests
- E-Portfolio's, not only beneficial for student reflection like Blogging but for also uploading and showcasing what students have learned and created in or out of the classroom.
- SeeSaw
- ItsLearning E- Portfolio
I highly recommend starting small so that there is not an overload of choices or too much time that could potentially be wasted. Students at any age struggle with time management so you can start small by providing three choices on a choice board and providing two to three class periods to complete. I'd love to see some of your student's creations!
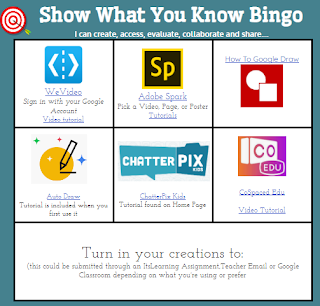
Here is an example of what a choice board could look like. I also recommend including "how to use" videos so that you aren't bombarded with the questions on how to use the digital tools so that your time can be spent on facilitation or pulling small groups for remediation or accelerations.
Starting out small:
 |
| Click to View and Make your own copy |
Moving to more choice once students have become comfortable with the use of technology:
 |
| Click to View and Make your own copy |
Or when your students are ready a tic tac toe choice board:
 |
| Click to View and Make your own copy |
DISCLAIMER: All of the tools on the 3 choice boards I provided have been approved for use in Spring Branch ISD. Although they have been approved be sure to check any age restrictions or limitations for the age group you teach.
As for the self care act for the week, was spending some time on one of my hobbies, sewing! I created this bookmark for the book study on "Innovate Inside the Box" by George Couros 😀


Thank you so much for your insights here! I am going to work on a choice board for my GT students. ( I also love that I too received one of your bookmarks!)
ReplyDelete